
Flynn is a an open-source self-hosted Heroku replacement… and it is great.
To me, it strikes the right balance of:
- Running your apps in a modern, highly-available 12-factor way
- Allows you deploy via either Docker or Git
- Provides some of the underlying databases you might need
Yes, when comparing it to some of the more elaborate Enterprise orchestration tools like Kubernetes or even Rancher, it lacks some features and customizations, but when you want to route & run your apps (and you are SMB), it’s approach is a pleasure to work with.
Personally, I’m more inclined to run my databases directly on other hosts so I can manage and back them up directly with something like Ansible* so this is Flynn for my use-cases. I’m primarily talking about hosting user-facing web applications and API servers.
* I don’t feel that Docker is ready for prime-time regarding persistent data, i.e. databases, but that is a whole other article…
This post contains the instructions to run a Flynn cluster at the Root of your domain. Doing so allows you to manage all of your applications (from your apex, www., api. and whatever else you might want to host) from one cluster. Flynn is a new tool, so configuring it to work this way requires a few tweaks. The Flynn team is working to make this easier going forward… but for now, install the Flynn CLI on your local computer, and lets go!
The version of Flynn this was based on (along with many GitHub issue notes and the Flynn documentation) is v20161015.2.
Creating your Flynn Cluster
Even though I’m running my Flynn cluster on AWS, I do not like the built-in Flynn AWS installer. It uses cloudformation to create custom security groups, integrates directly with Route53, and generally does some magic which isn’t customizable yet. That said, you can create your own cluster from any Ubuntu 14 AMI, and use the SSH tool to bootstrap your cluster. It works great!
Notes on bootstrapping your own cluster:
- Create at least 3 servers, all with the same hard-drive size and Ubuntu 14 AMI. Create them in different availability zones. The same hard drive size is important and Flynn will create identical ZFS mounts on all of your hosts… so they need to match in capacity.
- Every node needs port 443 (https) and 80 (http) open to the world. You will not be using a load balancer… this take some getting used to (more on this later in the DNS section).
- Get Elastic IPs and apply them to every node in your Flynn cluster. We’ll be relying on these IPs later in the DNS section too.
- Every node in the cluster needs to be able to talk to each other. The easiest way to to do that is to create a security group called "flynn" and allow it to have open access to itself using "All traffic".
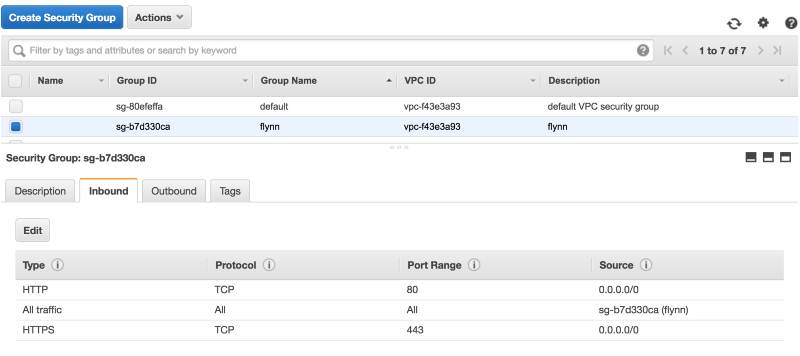
As you create external services, you can create new security groups for each one with the same self-access policy, ie production-elasticsearch. Only your Elasticsearch servers and then the Flynn nodes need it.
Once you have your servers up and running and your security groups applied, you can bootstrap your cluster with the Flynn installer.
# On your local machine flynn install
This will open your web browser to handle the rest:
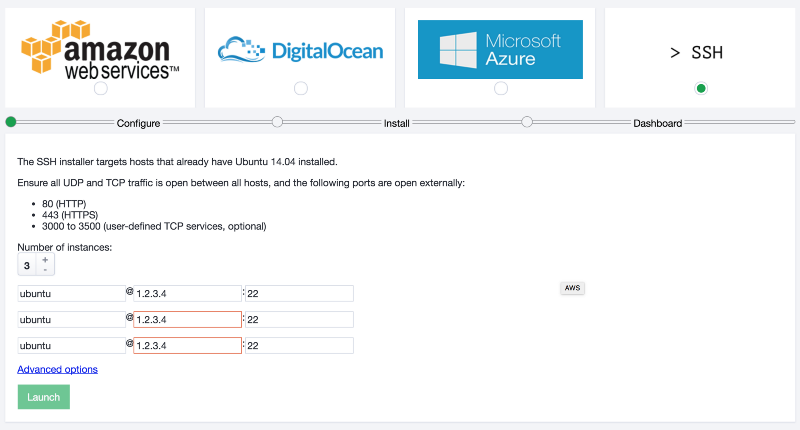
At the end of the install and bootstrap process, you are asked to download the certificate needed to access the dashboard. You don’t need to do this, we’ll be uploading our own shortly.
Cluster Monitoring
As of this writing, Flynn does not provide any monitoring or alerting on the cluster. This means that it is up to you to do so.
I’m calling this out in its own section because it is important. You can use tools like DataDog, Monint, Server Density… whatever you like. One of the main reasons I like to not use the AWS Flynn cluster creation tool is that I prefer to bootstrap all of my hosts with these tools before joining them to the Flynn cluster.
Are you running out of RAM? Hard Drive Space? How will you know until something goes wrong unless you are monitoring!

Flynn does provide a status endpoint an external service can poll, IE: http://status.site.com. You can learn more about using it here.
DNS
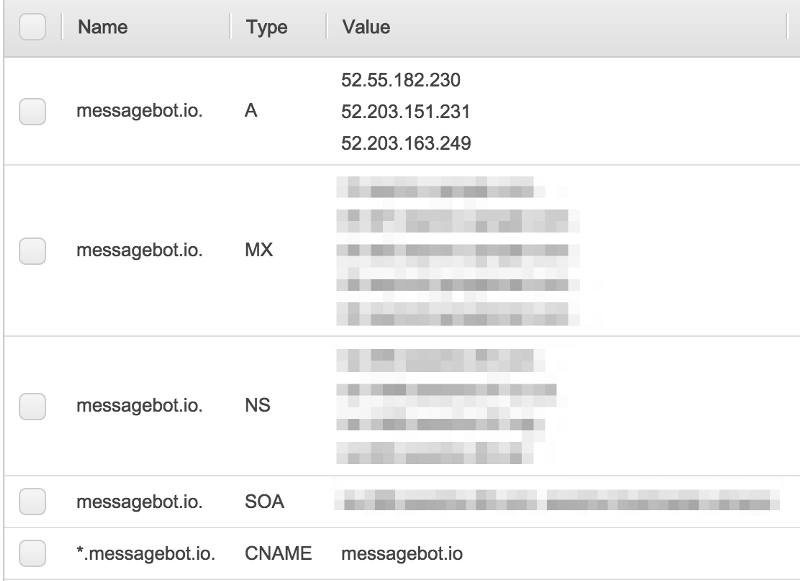
Flynn handles all of your routing for you. Any host can redirect a request to any other (mesh routing) to serve the client’s request. It is rather cool! To this end, you need to configure DNS in the following way:
- site.com (apex domain) should be an A record with the (elastic/static) IPs of your Flynn cluster nodes
- *.site.com (wildcard subdomain) should be a CNAME to site.com
In the manner, all of your future domains to be hosted by Flynn will resolve to your cluster.
If you are using Route53 you can also configure health checks to drop/add an IP address from your A-record should they become unresponsive.
Certificates
When you create a Flynn cluster, they automatically create a DNS entry for you on flynnhub.com. This is quick way to get up and running with Flynn for testing purposes, but we want to run Flynn for production. We want our own URLs, and therefore, our own security certificates.
First, purchase a wildcard certificate for your domain *.site.com. At the time of this writing, the cheapest option I found was though Namecheap. Download your cert.pem and key.pem and have them ready.
- Tell Flynn about the new URL we want to use:
flynn cluster migrate-domain site.comThis will also update all references to the cluster’s URL in your ~/.flynnrc the place where Flynn stores information about connecting to the cluster.
- Upload your new wildcard certificate to Flynn’s router application. All parts of Flynn are Flynn apps… it’s Flynn all the way down! We are using the Environment of the router to hold the body of our certificate
flynn -a router env set TLSCERT="$(cat cert.pem)" TLSKEY="$(cat key.pem)"- At this point, if you use the Flynn CLI again, you’ll run into a certificate error. Something like this
Error writing CA certificate: Get https://dashboard.site.com/ca-cert: pinned: the peer leaf certificate did not match the provided pinThe reason for this is that if you look in ~/.flynnrc, you’ll see that your cluster has the following information saved about it:
default = "mycluster"
[[cluster]]
  Name = "mycluster"
  Key = "xxxx"
  TLSPin = "yyyyy"
  ControllerURL = "https://controller.site.com"
  GitURL = "https://git.site.come"
DockerPushURL = "https://docker.site.com"TLSPin was created against the old flynhub.com certificate (or the self signed one). TLSPin allows the Flynn client to connect to self-signed servers without errors. Either way, it no longer matches the new certificate you uploaded. To generate the new value of TLSPin, do the following and replace the output in ~/.flynnrc:
openssl x509 -inform PEM -outform DER < cert.pem | openssl dgst -binary -sha256 | openssl base64Once you update the value of TLSPin, we can continue using the CLI to update our routes with our new certificate.
For the following apps we need to update their routes to use the new security certificate, since they were created by the bootstrap process, before the new cert was uploaded: controller, dashboard, gitreceive, and docker-receive. For each app, you will do the following:
# 1) look at the routes for the app

flynn -a controller route
ROUTE                               SERVICE     ID                                         STICKY  LEADER  PATH
https:controller.site.come      controller  http/ceacfb7d-e238-462a-aed0-9f4d1c087ea9  false   false   /
https:controller.abc.flynnhub.com  controller  http/d8553b80-f49d-4496-bc76-80492ba81256  false   false   /
# See how there are 2 routes?  One for your domain, and one for flynnhub.com?  Save the Route ID for *your domain* to a local shell variable

#2) export FLYNN_ID=http/ceacfb7d-e238-462a-aed0-9f4d1c087ea9
# Update the route to include the SSL certificates

flynn -a controller route update $FLYNN_ID --tls-cert cert.pem --tls-key key.pemBe sure to do this for all 4 of the default public applications.
As of this writing, you cannot identify a route by anything other than its ID (like name), but the Flynn team is working on that.
S3 BlobStore
The next thing to configure is using S3 as the "blobstore". The Bobstore is where Flynn stores all the things you upload to it. Docker Images, git repositories, etc. The reason for using S3 here is 2-fold:
- Save the disk space on your Flynn hosts for other things, like application logs
- Share the uploads with all of your hosts without needing to transfer the image around
To do this, first create the S3 bucket you want to use. It should only be used for this purpose, and be in the same region as your hosts.
Then, create an AMI user, note its AWS_KEY and AWS_SECRET and give it the following permissions:
{
  "Version": "2012-10-17",
  "Statement": [
    {
      "Effect": "Allow",
      "Action": [
        "s3:DeleteObject",
        "s3:GetObject",
        "s3:ListBucket",
        "s3:PutObject",
        "s3:ListMultipartUploadParts",
        "s3:AbortMultipartUpload",
        "s3:ListBucketMultipartUploads"
      ],
      "Resource": [
        "arn:aws:s3:::YOURFLYNNBUCKET",
        "arn:aws:s3:::YOURFLYNNBUCKET/*"
      ]
    }
  ]
}Now, we’ll tell Flynn to use the S3 bucket and make it the default going forward. Again, all parts of Flynn are Flynn Apps, so we’ll just be updating the environment settings of the blobstore application:
export AWS_KEY=ABC123
export AWS_SECRET=abc123
export AWS_REGION=us-east-1
export AWS_BUCKET=YOURFLYNNBUCKET

flynn -a blobstore env set BACKEND_S3MAIN="backend=s3 region=AWS_REGION bucket=$AWS_BUCKET access_key_id=$AWS_KEY secret_access_key=$AWS_SECRET

flynn -a blobstore env set DEFAULT_BACKEND=s3mainApps & Routing
Now that we are set up, we can deploy our applications!
When you create Flynn app, the name you give it is also its default route. So if you want an application to be served at www.site.com then name your Flynn app www via
flynn create --name wwwYou can also add many routes to your application, and you can always update them.
For your apex domain, you can either add that route (site.com) to an app of your choice, or create a very simple app which redirects all traffic to your www app. An example can be found here in this 20 line Node.js server:
When you push your first application via git, you’ll probably notice an SSL/HTTPS error. Something like this:
remote: Internal server errorfatal: unable to access 'https://git.site.com/project.git/': The requested URL returned error: 500This is because there is one more system setting that Flynn modifies: your ~/.gitconfig. If you look at it you’ll see 2 entries Flynn created: A authentication block and a certificate block:
[http "https://git.site.com"]
 sslCAInfo = /Users/evan/.flynn/ca-certs/flynn-abc123.pem
[credential "https://git.site.com"]
helper = /usr/local/bin/flynn git-credentialsFlynn does this (just as in the cases of the CLI) so that the self-signed certificate will work. However, we don’t want this any more, so just delete the sslCAInfo section, as we are now using a real, legitimate, certificate.
Access Security
The final topic I want to address is access security. Access to your Flynn cluster is gated only by a single key: the cluster "Key" in ~/.flynrc This key is used both by the CLI and by git. Look above at the settings in ~\.gitconfig again. When authenticating to the Flynn’s git server, it runs a key helper (flynn git-credentials)on OSX. That ends up injecting an entry into your Keychain which looks like this:
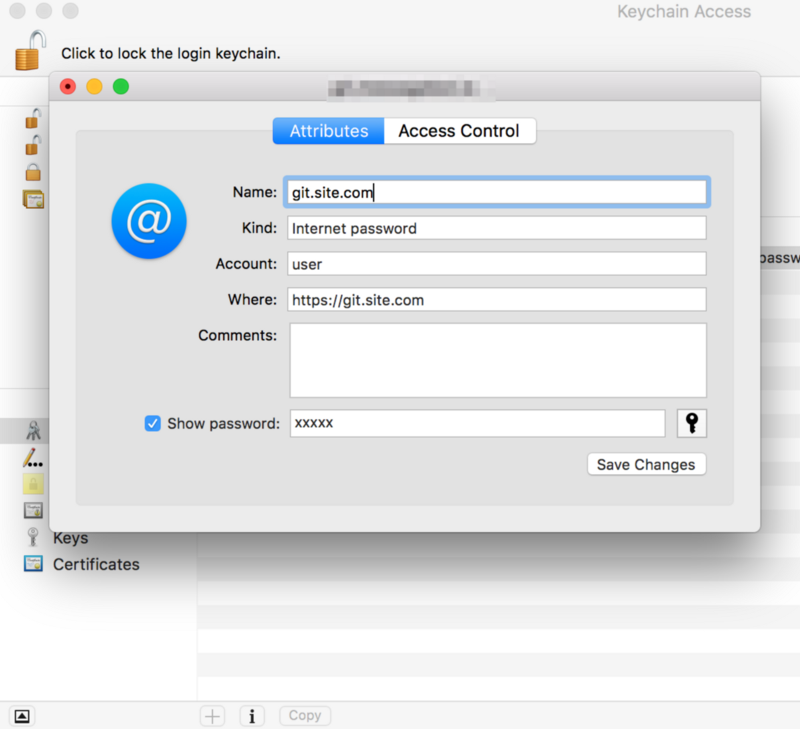
Yep, that’s the same KEY used again as a git password.
This is fine, and is secure… but it has no notion of authorization. All Flynn users have access to all parts of Flynn, and there is no way to revoke access to a specific user or app. If you are small shop, this is probably OK. If not… you probably want to work for a later version of Flynn which introduces these features. The Flynn team has been very responsive, and they are working on per-user access controls.